Showing posts with label frugal living. Show all posts

Tuesday, February 28, 2012

Homemade Naan Bread

Hello again! Sorry for the huge time lapse between posts. My life as a student has left little time for cooking and baking and even less time to blog about my day to day adventures. However, today I offer you a recipe for homemade naan bread. Most people think you need a tandoor oven to make delicious naan bread, but a cast iron skillet does the job perfectly. The recipe is incredibly easy, and costs a fraction of store-bought or restaurant naan bread. And, it is delicious!


Homemade Naan Bread
recipe from Madhur Jaffrey's cookbook, World Vegetarian

5 cups white flour (you could probably use any flour, but I have only used white)
1 1/2 tsp. baking powder
1 tsp. baking soda
1/2 tsp. salt
1 1/2 tsp. sugar
2 tbsp. plain yogurt (I used about 3)
1 cup milk
1 cup water
1 egg
1 tbsp. melted butter, plus more for cooking with
1/2 tsp. nigella and 1 tsp. sesame seeds (I did not use these)

Sift together flour, baking powder, baking soda, and salt. In a large mixing bowl, mix together sugar and yogurt with an electric mixer. Add the milk and water to yogurt and mix well. Slowly begin adding 2 cups of the flour mixture, little bits at a time. When all of the flour is incorporated, mix well for 2-3 minutes on medium speed to build up the gluten in the flour. Add the melted butter and the egg and mix well. Now slowly begin adding the rest of the flour, switching to a wooden spoon when the mixture becomes too thick for the electric mixer. The dough should be very soft and sticky. Dump it out onto a floured surface and knead a few times with oiled hands. Divide the dough into 8-12 balls, depending on the size of your cast iron pan (I did 12 for my medium sized cast iron pan). Liberally dust a baking tray with flour and place the balls two inches apart. Press and flatten the balls slightly with your floured hand and cover them with a tea towel (please do not use plastic wrap, a towel works just as well). Refrigerate the naan for at least 30 minutes or up to 48 hours. 


When you are ready to cook them, preheat your pan for 5 minutes. Melt a few more tablespoons of butter and dip your fingers in it. Take one naan at a time and press and shape them into a tear drop shape about 6 or 7 inches long (or long enough that the dough is about 1/2 inch thick and it will fit nicely onto your pan). Brush the top with a bit more butter and place (buttered side down) onto the hot pan. Sprinkle a small amount of seeds onto the top of the dough (if you are using them). Cook for about 2 minutes, or until nicely browned. Now because I don't use the seeds, I simply butter the top and then flip my naan over and cook them for another 2 minutes on the other side. However, the seeds would probably all fly off if you did that, so You can finish it off under the broiler until nicely blistered and brown. Cook all of the naan this way and keep them warm in the oven until you are ready to eat them. 

I would recommend only cooking enough to eat with your meal and leaving the rest in the fridge so you can make fresh ones as you want them over the next 2 days. Fresh off the pan is really the best way to have them. Or you could just cook them all and then eat a ridiculous amount of buttery, hot naan and feel really indulged and satisfied. I fully support that method :). 

I don't have a picture of the finished product, but this is what they should look like:


Tonight we are having this delicious bread with chana masala, recipe found here, and bengali spiced squash, also in World Vegetarian

What have you been cooking lately?


Tuesday, January 24, 2012

Homemade Bread

I have discovered the most amazing bread recipe that I have ever made. This bread rises beautifully, makes an excellent sandwich bread, and is has an amazingly simple method. I have been reading Rhonda's blog for quite some time now and have read her tutorials on baking bread, but never tried her recipe. Until last week. I am never going back! Here is her tutorial. If you have never made bread before (or need a refresher course) then make sure you check out her beginner's tutorial first before moving on to the intermediate, which is what I followed.

Here is what I used in my loaf:

(Barely adapted from Rhonda)
2 tsp. traditional yeast
1 tbsp. sugar
1/2 cup warm water

Mix all of these together and allow to sit for 10 mins, until foamy.


2 cups whole wheat flour
2- 2 1/2  cups white flour
1 tsp. salt
1 tbsp. skim milk powder
1 tbsp. olive oil
2 cups warm water

Put dry ingredients into bowl of mixer fitted with dough hook and mix together. Add the yeast mixture, oil, and about 1 1/2 cups water. Mix until dough comes together (adding water and flour as needed- I needed about 1 3/4 cups water and 2 1/2 cups white flour). Knead for 6 minutes in mixer, or 10 minutes by hand, until soft dough forms. Dump out of mixer, knead a few times, and form into a ball. Place in a greased bowl and cover with a tea towel. Place in a warm spot (I use my oven with the light on) to rise for one hour.


Punch down dough and form into a loaf. Wet the top of the loaf and roll into oats/seeds, or whatever you would like on the top of the loaf. You can skip this step if you just want plain bread. Place into a greased loaf pan and allow to rise until dough crests over pan (about 30 minutes).

Today's loaf- sesame and poppy seeds.

I received two cast iron bread pans for Christmas, and I am in love with them! They are entirely non stick already and produce a nice crispy crust every time. I love the fact that these will be my bread pans for life and they will just get better with age. That doesn't happen very often anymore.

Meanwhile, preheat your oven to about 450 F. Place risen loaf in hot oven for about 5 minutes, then lower the temperature to 400 F. Bake for 20 minutes, or until loaf is golden brown and sounds hollow when tapped.


Last week's loaf- oats.

This bread is delicious, frugal, and healthy! All of my favourite things! Let me know if you try it, I would love to know how it turns out for you and what you top it with! Do you have a favourite bread recipe?

Brenna


Sunday, November 27, 2011

Final Exams

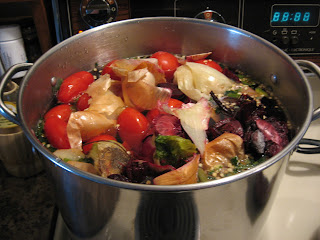
It is that time of year again! No, I'm not talking about Christmas (but I will be soon!), I am talking about final exams. I have been studying like crazy these past couple weeks and will officially be done as of Tuesday. Bear with me until then, because this space will be filled with holiday cheer coming up very soon! Amongst the books, I have found time to do some things around the kitchen. Today, I am making another big batch of vegetable stock. I borrowed D's parents giant pot to make the whole process go a little smoother, and it is simmering away on the stove right now, making enough stock to last us a good few months at least.


Today's batch is a collection from throughout the summer. There are about a dozen whole tomatoes that went a bit wrinkly before we could use them, beets (tops and bottoms), onions, cabbage, a whole bag of pepper insides and various others from our preserving days. These "carcasses" will make a rich and flavourful organic broth for literally zero dollars. We pay an average of $4 for a 1 litre container of organic broth at the store. This pot will probably make 10 litres. That is a HUGE saving! If you are interested in making your own broth it really couldn't get easier than this. I have a tutorial on how to make it here. 

Hope you are all having a lovely weekend! I will be back after Tuesday.

Brenna

Friday, November 4, 2011

Hearty Winter Vegetable Stew

This is the perfect meal for a cold winter's night. Pair it with a thick slice of bread slathered in butter and you have a stick-to-your-ribs meal without a whole lot of calories and plenty of vitamins, minerals, fibre, and vegetables!


Prior to thickening with flour


Ingredients
serves 2 for at least 2 meals

2 tbsp. olive oil
1 onion, chopped
2 large carrots, chopped
1 medium potato, cut into 2 cm pieces
3 cloves garlic, diced
several mushrooms, sliced
1/2 cup red wine
1 cup frozen peas (or any green that needs to be used up)
3 cups vegetable stock
3 cups water 
1 bay leaf
1/2 cup pot barley or any other grain
salt and pepper, to taste
2-3 tbsp. flour (to thicken to desired consistency)

You can also add broccoli, cubed tofu, or any other vegetable you have on hand, and you can use all stock or all water.

Saute all veggies, except peas, until golden in a large soup pot. Deglaze pot with wine, making sure to scrape all the little brown bits off the bottom of it. Add stock, water, bay leaf, and peas and bring to a boil. Add barley and simmer until it is tender, about 30-40 mins. Season to taste. Mix flour with a bit of softened butter or water, whatever you prefer, and stir into soup. Add more flour if it doesn't thicken enough for your liking. Simmer for another 10 minutes or so. 


This is a lovely quick meal that is frugal and reheats beautifully. I hope you try it, as it is a huge hit in our household! It can never hurt to have a glass of wine with it as well...

Enjoy!

Brenna


Tuesday, October 4, 2011

A Change of Pace

Hello! We have just gotten back from a weekend away visiting my family. We went grape picking with my grandparents (more on that later!) and got in a great visit with my parents as well. However, when I was away I received notice that I will be laid off in 3 weeks due to my workplace having a financial crisis. I had a feeling this was coming from recent talks these past couple weeks, so I was not surprised, but definitely disappointed and a bit concerned. I have been working at this same job for the past 3 years and really have no experience outside of my field, which is veterinary reception. But, I have decided to take this as an opportunity to slow down a bit more and really think about what I want to do with my life's work. I am still going to school working towards my B.A., so that will continue, but until I can find another job I will have to change my lifestyle a bit to make up for the fact that my pay cheques will no longer be coming in.


Here are my plans:

1. Use public transit whenever possible to save gas (I pay for a pass in my tuition every semester, so I might as well use it!)

2. Frugal meals! This is already a staple in our household, but I will be extra conscious of using whatever we have on hand and trying to make as many freezer  based meals as possible. This also means no more eating out, no more buying bread, and making everything from scratch. I will also be relying on my canned goods and pantry to get us through rough patches.

3. Cut my cell phone down to the bare minimum. We do not have a land line and I have a contract so I cannot cut it out entirely, but there are some cheaper plans that I will be researching.

4. No more paying for tea/coffee. We have tons at home, I do not need to buy it.

5. Stay in! We hardly ever go out, but from now on it is cheap home entertainment.

6. Focus on my studies as much as possible, as this is the path to my success.

7. Write, every day. I am constantly making excuses as to why I don't write, but now I will have more spare time, so I need to dedicate myself to it. My last professor told me I have the talent to be a professional writer, and I need to hone my skills and get my creative juices flowing!

8. Enjoy this time! I need to realize that this has happened for a good reason and I need to embrace this stage in my life. I want to enjoy being at home and make myself relax and slow down more.

I will also be scouring Rhonda's blog for more tips on frugal living, as she really is the master of it.

I would appreciate anyone's input on this, and would love to hear your tips and tricks to frugal living! Have you ever been in a situation similar to mine? How did you manage?

Brenna

Thursday, March 17, 2011

Homemade Yogurt

I am so excited for this post, because it is about something that I have never done before, and it is taking us one more step towards a more frugal lifestyle! Over my weekend, I made yogurt, and it was successful! I wasn't very confident that it would work, but it did, and it was so easy! Here is the recipe I used:

Homemade Yogurt


4 cups (1 quart/litre) milk- I used organic whole milk
2 tbsp. plain yogurt (store bought to start off with)

That's it! Begin with putting the milk into a heavy pot, and bring it to a boil. Once it begins to bubble up, take it off the heat, and cool it down to 110 degrees F. I did this quickly by putting the pot into my sink that I had plugged with cold water.

Bringing the milk to a boil

As the milk is cooling down, whisk the 2 tbsp. of yogurt in a large ceramic bowl, until it is smooth. When the milk has cooled down, very slowly stir it into the yogurt. The recipe then called to cover it in plastic wrap, which I did for my first attempt, but next time I am just going to use a tea towel. 

Cooled milk and yogurt mixture, covered and ready to ferment

After covering it, it you then must keep it in a warm place (85-110 degrees F) for 7-10 hours, until it is thickened. I did a bit of research, and decided to try and use my electric blanket set on medium as my warm spot. 


After the first 5 or 6 hours, I found that my blanket wasn't really keeping the bowl warm enough for my liking, so I moved the bowl into my oven on the lowest possible setting (roughly 100 degrees F), and kept the light on. After 10 hours had passed, the mixture was still quite runny, but it smelt like yogurt, and I had read that refrigeration overnight usually thickens up the yogurt significantly. So I poured it into some containers, and went to bed with a wish.

The next morning, the yogurt had thickened beautifully! I was so excited! And it is delicious! Not too sour, and a nice creamy flavour. It isn't quite as thick as my usual store brand, but it was great anyways. I eat a lot of yogurt, usually going through a tub per week. This recipe made one tab, plus another third of a tub. My usual yogurt is plain organic, and the cheapest I can get one tub for is $3.50, and the regular price is $5.29. The milk I bought for this recipe cost $3.99 for 2 litres, which makes 2 recipes, making each recipe cost $2, and I got more than a full tub. So it really is very cheap. If I bought a 4 litre of milk, then it would go down even more. And, I love that I made it myself, with my own two hands. For the next recipe, I can use 2 tbsp. of my current homemade yogurt, therefore continuing the cycle, and preventing me from having to buy it from the store again. 

Here is the finished product:

So thick and creamy

Hope you are having a lovely week thus far!

Brenna


Sunday, March 13, 2011

Homemade Vegetable Stock

I have recently started making all of our stock at home, and I really cannot figure out why it took me so long. This is the easiest way to have a constant supply of stock, and it pretty much costs nothing to make.


We used to buy organic stock in the little tetra packs, and it was expensive! The cheapest we could get it (on sale) was about $3 for a one litre container. And we would regularly go through at least two per soup recipe, so it was getting a bit ridiculous. Plus, the amount of sodium in the store bought broths is disgusting!  Once we started reducing the amount of salt in our diet, we really started to taste how salty the broth we bought was, and that was the turning point.

I have many recipes in my many cook books for vegetable stock, but what bothered me was that they all called for the use of fresh vegetables that you would have to discard afterwards. I think it is kind of silly to use beautiful, fresh produce to boil down into a broth. I mean, when you make chicken stock, you use the carcass of the chicken, in order to use up every last bit of the flavor. So why can't I use my vegetable "carcasses"? Now what is a vegetable carcass? It is the part of the vegetable you were just going to throw away and not eat. So I began saving all of the pieces that I was just going to discard anyways, and put them in a large freezer bag in the freezer. When it got full, I made stock. Here is my latest bag:


The ingredients? A lot of broccoli stalks, some wilty celery and cilantro (not going bad, but too wilty to cook with), onion tops, some shriveled ginger, garlic ends, carrot peels, shitake mushroom stems, and a special twist that I think made this batch of stock especially rich.  The juice from canned tomatoes. I had a recipe that called for whole tomatoes, drained and chopped. Well, instead of chucking out the juice, I decided to pour it into the bag, to add a nice tomatoey flavour. 

It takes a couple months to fill the bag, but the full bag also makes enough stock to last a couple months. I think that the size of your family will be relative to how many vegetables you save, and the amount of stock you use.  

So how do you make it? Well, it really couldn't be easier. You start by dumping all of your vegetables into your biggest pot, and covering them with water. Now my pot is not that big, so I ended up diluting my stock at the end, just to make it go a little further, and because it was quite rich. Keep in mind that the bigger your pot, the longer boiling time you will probably need, but you will get more stock. 

Vegetables covered in cold tap water


Next, you put the pot on the stove, cover it, and bring it to a boil. You then let it simmer/boil for about 2-4 hours, depending on how much time you have, and the size of your pot. I had to keep topping up my pot as some of the water absorbed, so just keep an eye on yours. You always want all of the vegetables covered in water. I let mine boil for about two and a half hours. I do not add any salt to my stock, as we like to salt our meals as we cook them, and I don't want to have to count the salt that is already in the stock, but you can do as you like. If you add salt, don't add a lot, and put it in at the beginning of the boiling process. 


Once your stock has boiled for a sufficient amount of time, remove it from the heat, and strain it. I get my biggest bowl out, put it in the sink, and put a big colander on top of it. I then dump the hot mixture into the colander, and let it strain. My bowl wasn't quite big enough to fit everything comfortably, so I ended up using a second big bowl to get the rest of the stock out. I also used a big wooden spoon to squash the vegetables a bit, to squeeze out any water they may have been retaining.  You may end up with tiny little bits of vegetable in your stock if you use a bigger colander, like I did. If that doesn't appeal to you, then simply use a fine sieve to strain your vegetables. 


Next, let your stock cool for a few hours, then ladle it into your freezing containers. I use old yogurt containers, and fill each one within an inch of the top. I find this amount is perfect for our recipe sizes. 

Please ignore the weird yellowish circle on the bottom left container, it is a trick of the light caught by 
my low quality camera.


Label your containers, and freeze them, and there you have it! Homemade stock, made entirely from scrap you were just going to throw away! Now go and get yourself a large freezer bag and start saving your vegetables!

Brenna